A Simple (Lunar) New Year Makeup Tutorial


So yeah...I recorded this in December with every intention of posting it on 12/31/2010. Oh well. ahaha I did say procrastination was one of my New Year Resolutions ^_^  Also it surprises me a bit that people are more interested in seeing wearable, every day looks (see poll to right..and vote ^_~), but I guess it's just because I personally enjoy watching more costume-y tutorials xD  Anyway, here is my stab at a wearable look (ironically, for a holiday when most people wear dramatic, party looks hehe).  I had a mild cold in this video so sorry if I sound a little "sleepy" :}


Products Used:
NYX Jumbo Eye Pencil in Milk
Maybelline Charcoal Smokes Quad
Maybelline Designer Chocolates
Koji Dolly Wink Liquid Liner in Black
* UD Uzi (optional)
* UD Maui Wowie (optional)
Maybelline The Falsies Mascara in Black
UD 24/7 Glide Pencil in Lucky
Lioele Silky Highlighter BB Touch
NYX Mosaic Blush in Dare
Etude House Dear Darling Lipstick in Coral Shine 07
The All Natural Face lipgloss in Aztec Gold

* =  from UD Book of Shadows 3


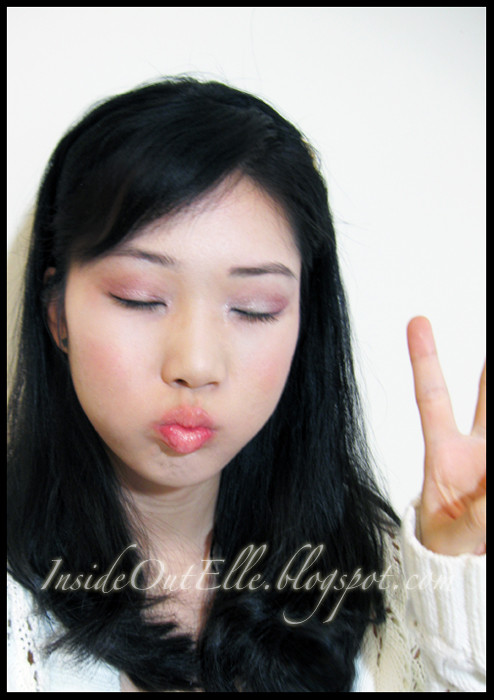
I dunno why the pic on the left turned out so green and the right so yellow :P   Colors are most accurate in face shots.  Anyway, I was aiming to create a wearable, but still celebratory look that blended berry reds, silvers, and golds~ The colors were inspired by how Chinese believe red and gold is lucky and how white and silver are supposed to "rabbit year" colors. 

In any case, I really like the Maybelline Expert Wear Quads, they're so...useful.  Plus they're easy to get your paws on in drugstores/online and cheap to boot :D!  I snagged two of mine at a BOGO 50% sale at Walgreens, thanks to Sisi Sparkles who posts drugstore sales every week. I own three Maybelline Quads: Charcoal Smokes, Natural Smokes, and Designer Chocolates. I used two of them in this tut :}  I have fantasies of owning ALL the quads, but since I just picked up the UD Naked Palette *sigh* I will have to refrain from getting any more "neutral" palettes.


The red crease color from Maybelline's Designer Chocolates also really strikes me as a dupe for the burnished red/berry color in the NARS Cheyenne duo.


Temptalia's swatch makes it seem like NARS Cheyenne's is a wee bit on the brown side and more pigmented.  I can't say for sure though since I've never seen the duo in real life.  But Maybelline's red crease color in just about the only red-ish eye shadow I can work with - it's a soft, shimmery berry red color, it's the whole reason I purchased that palette.  I'll be doing a collective review of Maybelline Quads so I'll do swatches then :}

To amp up the look, of course, I whipped out my trusty UD Book of Shadows III!


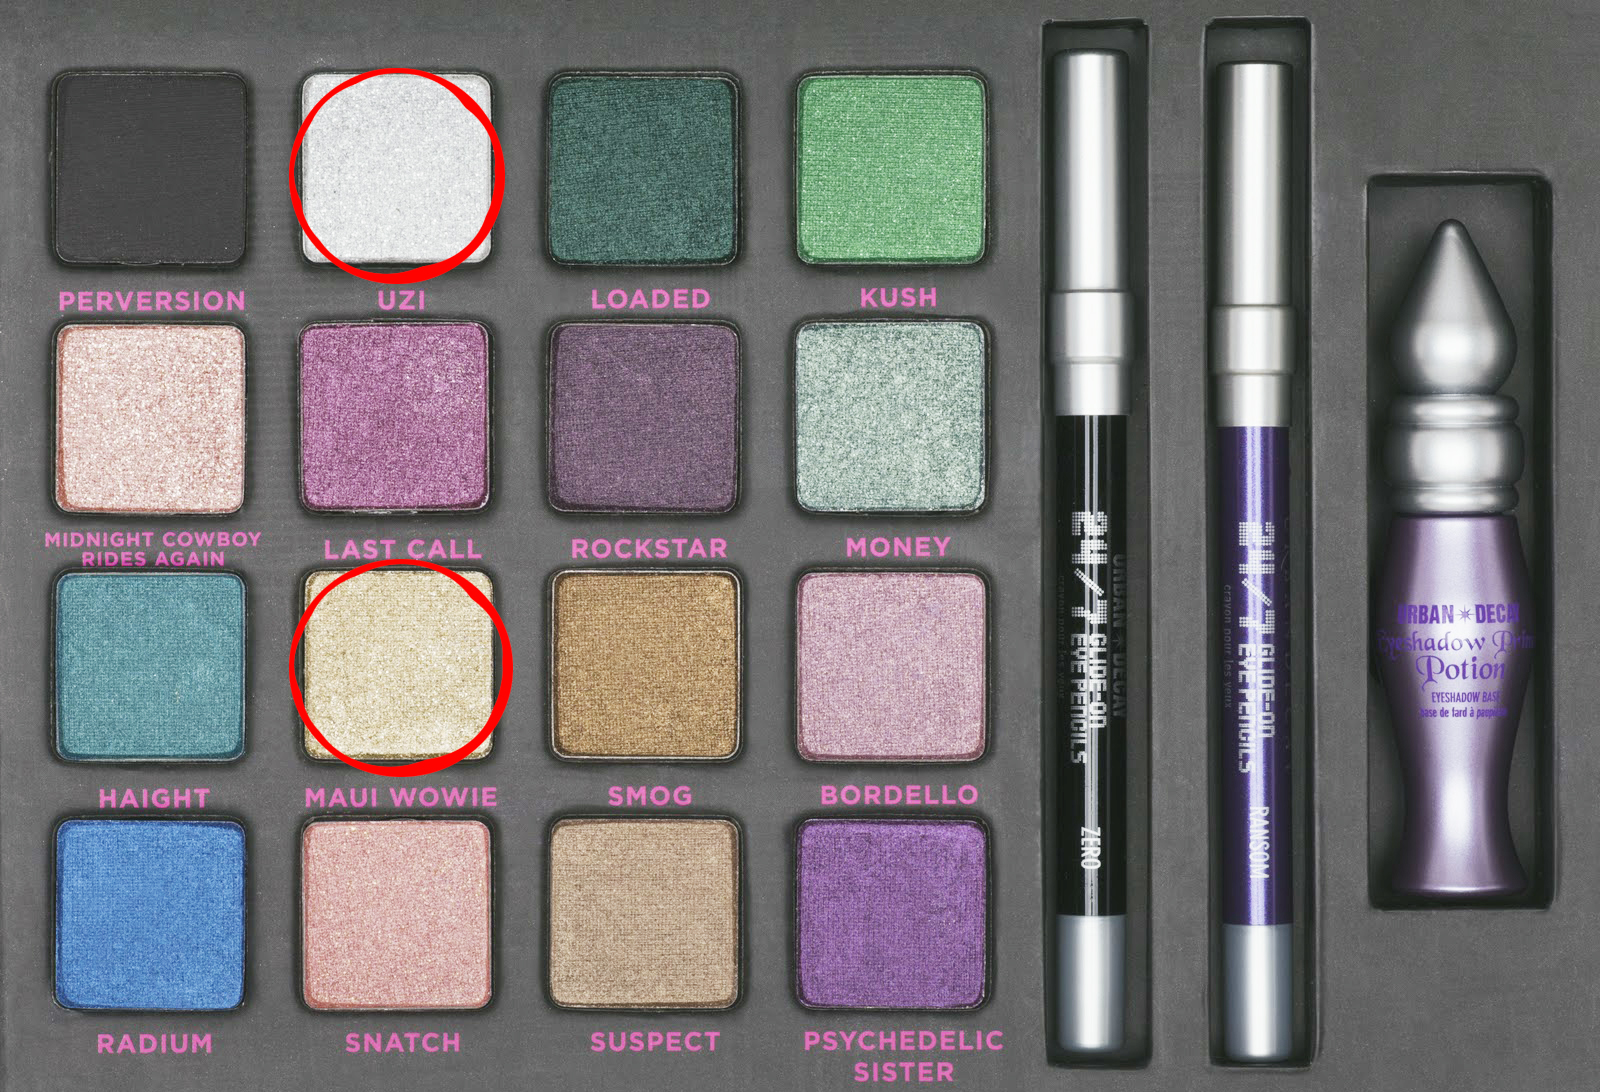
Uzi and Maui Wowie are glittery shades and have a bit of fallout. Not bad though :) I consider these colors "optional" colors for this look though, the red crease color is really the showpiece ^_^


And yes, I cut my hair. I regret it so much. I asked the hair dresser to trim off 2-3 inches and she chopped off SIX inches within seconds of saying, "Nah, 3 isn't enough, you have too much hair." *snipsnip* Me: O_O?!  It was so much hair it looked like a small possum had died behind my chair.

Ugh, the trials of getting your hair cut by one of your mom's friends - I swear that Korean ahjummas are fully content to make decisions FOR you whether they're your mom or not if you're below the age of 30.  I should've just gone to my trusty (and more expensive) hair stylist.  All I'd wanted was to trim off my split ends, retouch my bangs, grow my hair for 2-3 more months, snip off the whole shebang to donate, and get a bob cut -___-  Now I have to grow my hair out again for another year to donate (minimum hair length is 10 in) and I am deeply unsatisfied with my hair. For one thing she didn't thin my hair so my head still feels "heavy" and my hair is even frizzier O_O   And while it still feels heavy and unmanagable, I am much more limited with the hair styles I can do.  I miss having my tumble of hair to play with. Now I shed just as much, my hair is frizzier, and I am stuck doing braids and little pony tails.  Whine, whine, bitch n moan *sigh*   I'm such a baby. I know hair grows back, but I miss my little cape of hair :(

Ok, enough of that xP  Time to go eat some macarons and drool over Iron Chef reruns!

Hair Tip

***A random tip*** When making french braids if you braid with the hair going over the top the braid will lay flat. If you pull the hair under the braid will be raised.

NOTD: Zoya Ibiza + Nubar 2010 = Perfect New Year's Nails!

Reminds me of the Rainbow Fish ^_^!
1 coat Zoya Ibiza <-- be sure to check out Zoya's 3 Free Polishes Sale
2 coats Nubar 2010
1 coat Seche Vite Top Coat
Ooo...my first NOTD ^^  I am without question a total nail polish noob.  Nail polish is very recent interest of mine - as in, I bought my first 'real' nail polish (aka not costume polish that chips in a day) sometime November at Zoya's BOGO Sale.  I wasn't crazy about Zoya Ibiza when I first tried it.  It's a deep blue, almost black nail polish with a very, very subtle shimmer.   A bit boring I thought, so I put it aside for awhile.


I was also one of the people that totally missed out on Sally Hansen Hidden Treasures nail polish. It was a notoriously difficult polish to get ahold of and Limited Edition to boot, so I never got it.  I remember on Ebay, these polishes were going for $25+ a bottle, it was ridiculous.  Anyway, a perfect dupe of the famous Sally Hansen Hidden Treasures has emerged in the form of Nubar 2010, Nubar's 10th Anniversary special edition nail polish!  Karla Sugar and Scrangie have done excellent comparison swatches of both, but I have posted one pic from Scrangie for your convenience:

Index: One coat of Nubar 2010
Middle: One Coat of Sally Hansen Hidden Treasure
Ring: Two coats of Nubar 2010
Pinkie: Two coats of Sally Hansen Hidden Treasure
(All over one coat of Wet n Wild Black, no topcoat, no basecoat.)
Both reviewers claim that price, quality and application are all generally same between both :) and they both certainly look identical so that's all good.

I am so thrilled with Nubar 2010, it's a definite dupe of SH Hidden Treasures and for the 4-5 days I've been wearing the nails above, I haven't experienced any chipping.  I think the Nubar 2010 looks best over a dark polish and the deep navy hue of Ibiza adds a beautiful dimension to the iridescence of Nubar 2010 instead of just a solid black :D  It's the perfect New Year's Day look because it reminds me of fireworks in the night sky!

And for peeps who are enchanted by the Nubar 2010 as I am - I will be holding a giveaway that includes a new bottle of Nubar 2010 soon so stay tuned ^_^ wheeee~

Zoya 3 FREE Polishes Sale + UD Naked Palette Re-stocked @ Sephora!

We have the best fans in the world! As promised, the code is listed on the image above. The code is good for 3 Free* bottles of polish. The code is now active. (Because we love you guys and didn't want to make you wait until the 4th!) The code will be active until January 7, 2011 at 11:59PM EST.
Huge thanks to Steph for giving me heads up about Zoya's 3 FREE Polishes Sale! This sale ends in 3 days so now's your chance to grab any 3 Zoya polishes for only $6.95 total ($2.32/each) - basically, all you have to pay for is shipping!   I've tried Zoya polishes before and they have an excellent formula, silky smooth and long-lasting (though it does vary a bit by color).  I personally recommend Trixie (a beautiful silver), Goldie (a true gold), Freja (a gorgeous gunmetal, my personal favorite), and Jo (a unique, delicate cornflower blue-lavender color that is perfectly opaque with 2 coats).

All colors are in stock so grab the colors you want Zoya now, code FB2011 at checkout. This sale is limited to US.


These are the colors I picked - What Zoya colors would you get?


The famous and ever-elusive UD Naked palette is actually IN-STOCK at Sephora.   It definitely has been the most-hard-to-get palette of the season so get yours now!  Also, UD Naked Palette is now being sold for $44 on Amazon by Urban Decay.  It should qualify for free shipping even if you buy on Amazon, just read the instructions carefully.  Amazon can be your backup place to purchase if Sephora runs out of stock (which they prolly will in a few hours).  Lastly, rumor has it that the Naked palette will be re-stocked at Ulta stores/online very, very soon. Don't forget to go through E-bates if you're buying at Sephora for 4% cash back! So, gogogo :D! Good luck!

Review: More Boscia, CO Bigelow, & Revlon


Ahh, I got so lazy after New Years (oh no!), so it took me few days to get up off my butt and finish editing this video.  It's got a lot more text in it than usual O_o or maybe that's just me...


Boscia Luminizing Black Mask


Definitely by far my personal favorite and the most asked-about product I've mentioned so far :D


Purchased: $34 @ Sephora & Bosica
This jet black, mineral-rich peel-off mask delivers powerful detoxifying, purifying, and brightening results as it exfoliates skin and refines pores. Dead skin, impurities and excess oil are stripped away along with the dried mask for immediate and visible results.

Benefits include:
• Dramatic improvement in skin's clarity and radiance. Skin is brighter and smoother.
• Impurities, bacteria and excess oil are drawn out.
• Powerful antioxidants to prevent free-radical damage, such as lines, wrinkles, dryness and dullness.
• Reduced skin roughness and minimized lines and wrinkles, resulting in younger-looking skin.
I previously mentioned in my December Favorites video that I like how this removes white/blackheads while several reviewers have specifically said that this does not remove blackheads. So, I would like to clarify:
1.) This mask will NOT remove blackheads if you just use it after simply washing your face. 
2.) To reduce blackheads with this mask takes 2-3 rounds AND you must steam your face beforehand each time.  Aka it's a labor-intensive process but it has worked very well to reduce the blackheads not just on my nose, but also on my cheeks.  Keep in mind you can't expect miracles - you need to do this 1-2x a week for a month to legitimately see blackhead reduction.  For me, it was well worth it.  Especially since this mask is quite expensive, I wanted to get the most benefit out of it as I could.
Good:
- Really effective whether or not you steam your face.
- Definitely luminizing and helps skin turnover.
- Seems harsh yet had NO breakouts.
- Saw definite immediate and long term improvements.  Scar lightening (after 3-4 uses) and fantastic improvement in skin texture and tone right away.
- Saw white/blackhead reduction after 2-3 uses.

Bad:
- Pricey at $34.
- Must use a lot of product at once.
- Can't put this over inflamed acne and open lesions.
- Quite drying without moisturizing.

Here is the process I follow each time I use this mask. The simpler version was in the video, this is a more in depth step-by-step.

How I Use the Boscia Luminzing Black Mask:
1.) Boil water. I use an automatic tea kettle ^_^ Have a bowl with a small, clean washcloth ready.

2.) When water is boiled, pour the boiling water into the bowl with the washcloth in it. Let the washcloth sit in the boiling water for 5-10 minutes.  This will help sanitize the washcloth further, besides it'll be too hot for your face.

3.) During those 5-10 minutes you are waiting for the water to cool, put a damp towel (it'll hold the heat/steam in better) over your head and steam your face.  It'll be bit hard to breathe and you should be sweating inside a minute.

4.) When the water is cool enough for you to hold the washcloth, it's time to massage your face.  The water should still be steaming and kind of hurt (not BURN) your fingers when you are holding it.  Pinching the hot washcloth in your fingers, gently place it on your face. I like to just lay the hot cloth on my face and press gently.  I do this until the water is just lukewarm.  Do not scrub, DAB the cloth on your face.  Hot water helps kill bacteria and "opens" your pores.

FYI: Pores do not open/close like stoma on a plant :P It's a common misconception, but what steaming/using a hot cloth does is soften the dirt in the pore so that it comes out easier.

6.) Apply the Boscia Black Mask right away.  Avoid your eyebrows and make sure your hair is pulled back. This thing will yank out any hairs you get it on so be careful :P   You need to apply a thick layer so that you can peel it off all in one sheet ^_^

7.) Wait till mask dries completely, which takes 20-30 minutes.  The edges will dry first and the cheek areas will dry last.

8.) When the mask is completely dry, pick at the edges and peelllllll~!

Look at all those white heads and skin flakes O_O!

9.) Your face is going to be pink afterwards.  Use toner to take off the last bits of the black mask.  Stubborn bits may have to be rinsed off.  Then apply serum, essence etc. The only truly critical step is - you must apply moisturizer especially if it's winter.  Just blob on the moisturizer to be on the safe side.  Now you're done!

So, yeah. Like I said, it's a pretty intensive process.  As they say...no pain, no beauty :\  After 2-3 rounds aka 2-3 weeks though, you should start seeing definite, long term improvements in the pore/blackhead department, maybe in even scar lightening.   If you're someone who touches your face a lot though - that's a habit you're going to have to break before you want to see any long term improvement.  

CO Bigelow Mentha Lipgloss


Purchased: $7.50 @ Bath & Body Works
Our mint-infused lip balm provides a glossy high shine with a refreshing cooling sensation.  Lips stay moist and protected while peppermint oil gives breath a long-lasting freshness.
Good:
- High shine.
- Lovely minty scent and flavor.
- Breath freshening.
- Nice tingling sensation.

Bad:
- Slightly sticky.
- No staying power.
- SLIPS OFF MY LIPS :P and makes it look like I'm drooling...

Apparently this is America's #1 selling lipgloss. But all I have to say is....not for me.  It slips off my lips and makes it look like I'm drooling :P  The shininess is nice but it looks even more "drool-like" when it's not on your lips.   The extreme minty-ness is excellent (I love peppermint) and does disguise bad breath for like....five minutes, but overall, it ain't worth it because it doesn't stay on my lips at all. Plus it's definitely sticky, something I hate in lip products.  I think it's kind of a hyped item honestly, surely there are other high-shine, minty glosses out there.... 

Revlon Colorstay Liquid Foundation in Buff 150


Purchased: $10-12 @ Walmart/other drugstores
Specially formulated for combination or oily skin, this oil-free formula helps control shine all day and gives you flawless looking skin. Makeup looks fresh and feels great for up to 16 hours thanks to the lightweight, comfortable feel from the SoftFlex ColorStay™ formula.   20 colors available.
Good:
- Decent price for a "photogenic" foundation.
- Doesn't oxidize too badly.
- Nice silky application. Blends well.
- Dewey finish.
- Smells alright.
- Wide color selection (20 colors).
- Medium-full coverage.
- Buildable.
- Lasts a respectable 7-9 hours.

Bad:
- Prone to caking.
- It starts off as a dewy finish but on some days I get an oil slick on my face :P  Lack of oil-control is what it is I guess.
- Weak product design, sometimes foundation just POURS out of the bottle.

Not much to say about this beyond what I said in the video.  I don't use this very often because I use BBcream daily (all are SPF 30+), so I only use this when I want to take pictures since it only has SPF 6.  In other words, this is my "camera-friendly" foundation.  I mainly use this because it has a subtle dewy finish without making me look oily on camera, has good coverage, low SPF, and is decently priced.  I don't recommend this for people why want a "daily-wear" foundation since it has no SPF. But for for those looking for a camera-ready foundation, this would be a good option since there are a ton of colors to pick from and won't oxidize while you're taking pics :)

Beauty Trends for Winter 2011

Hello~ Just wanted to throw up a quick post of upcoming beauty trends from the Sephora's Beauty & the Blog.


I am totally digging the lower lash line emphasis trend - AWESOME for mono/hidden lidders ^_^ Plus you don't have to worry about blending as much since the lines and edges should be sharper on the lower lash line. 


I'm not sure how any of the looks they used to accompany this post are "pastel" in the "Easter" sense, I suppose they meet soft pinks, apricots, and minty greens.  I totally dig this too; it's weird but I've totally been on a pastel/creme color kick lately.  I just picked up the China Glaze Re-fresh Mint nail polish:

Swatch credits to: Vampy Varnish

And a creme pink Lioele Princess Nail color in Pretty Pink.


Basically a lot of pastel xD Anyway, I want to quickly finish editing a video and hopefully, I'll be able to post it up later tonight :D

Braid to Hold Bangs Back

 I started by pulling the front hair as shown below and moved it out of the way.  Then I took a small line of hair and make a french along the front of the I pulled aside as shown below too.
 Take the front hair and the french braid and pull them together and secure with an elastic behind her ear.