Showing posts with label Halloween. Show all posts

American McGee Alice Inspired Look

The background is actually from Tim Burton's Alice In Wonderland movie not the games ^_^

Hello everyone, even though it's way past Halloween, I hope you don't mind if I share my Halloween look with you ^_^ I was Alice from the game by American McGee.  The sequel to Alice, which is called Alice 2: Madness Returns is coming out in 2011 and I am so excited :D!!  Alice's look has changed a bit between the games; so I chose to base my look off of pre-released screencaps of Alice 2. In Alice 2 she has gotten older, has a side part in her hair and even a bit of lipgloss ^_^ Otherwise, she still has her trademark blood-spattered blue dress+apron, vivid green eyes, gaunt face and infamous Vorpal Blade.


Oddly enough, it looks like she has red lipstick in some of her screen caps :\ but I decided to go with a nude, sickly lip color xD Overall, it was a pretty basic look and I had lots of fun getting into character~ Ehehe, I feel like I'm cosplaying more than anything else but it's all good yeah ;)?


Products Used:
Revlon Colorstay in Buff 150
NYX Single Eyeshadow in Blue Marine
UD Perversion (from UD BoSIII)
UD 24/7 Glide On Pencil in Yeyo
Koji Dolly Wink Liquid Liner
Maybelline The Falsies mascara
Revlon Fantasy Brows Pencil & Gel in Brown
Neutrogena Healthy Skin Custom Glow Blush & Bronzer Duo in Raisin Glow 50
TonyMoly BBcream Party Pact in Shade 2
Lioele Silky Highlighter BB Touch
R&R Contrived Pressed Blush in Foreplay
NYX Round Lipstick in Thalia
NYX Round Lipstick in Rea
C.O. Bigalow Menthe Lip Gloss

Circle Lens: Super Nudy Green (at 14.5mm these are unbelievably huge O_O I would never wear these except for cosplaying/costumes....I look like a deranged cat, which is perfect for the Alice look ;) And the color is super bright, like a lizard, so they show up like none other. Proper review coming up soon.)

Costume: from FoundCostume for $42.99 + $5.99 S&H = $48.98 in Medium. It is now listed as $39.92, prolly cuz Halloween is over (lesson: shop for costumes earlier :P).  Anyway, I will review my ordering experience with this website in a separate post because I have quite a bit to say about it.

Note on Lashes: I would actually highly recommend thick, dramatic lashes for this look :) Just be sure to apply the lower lashes below the white highlighting on the waterline.  Since Alice's eye makeup is basically an overdone smoky eye, it would add a lot.  You might have noticed I don't bother with false lashes very often and it's because I don't like wearing them and don't have many false lashes on hand (the only two I have are very natural looking) :\ but false lashes do add a lot to a look, especially on Halloween, so do wear them if you have a nice pair.

I planned on making this much more extreme (aka much heavier eyeshadow, more contouring) but I HATE the Neutrogena Blush & Bronzer Duo in Raisin Glow 50 I've been using to contour - it was becoming so streaky and orange that I simply could not build up the layers.  DO NOT BUY IT!   Ironically, I use it a lot but it is flat out because I haven't had time to pick up anything else. It's very streaky and hard to work with.  Also the blush is right next to the bronzer, so all the glitter from the blush (which is very pigmented) ends up mixing with the bronzer.  Plus it oxidizes orange.  I'm going to do a post about this product later (I'm so back logged on reviews because of these Halloween looks) but yeah, don't buy this item.  On the upside, I found a use for the NYX Round Lipsticks Thalia and Rea!  If you recall, I reviewed my NYX Haul and said that these two colors were terribly unflattering on me...well, they're perfect for sick/zombie/unhealthy/undead looks xD Thalia has a purple undertint (so I look bruised) and Rea makes my lips look gray and chapped.  It's really much more obvious in real life and it added a lot to the look :)

For once I was disgruntled how good the lighting was that day >_> It's hardly creepy...well, at least you can see the make up ^_^  Also, you can't see it here but my contouring is so streaky and orange, I was furious...in my review of the Neutrogena Blush & Bronzer Duo I will include a picture from this set that shows how  streaky and orange it really was. But for now~


I also ventured outside to snap a shot in the classic Alice pose... I'm very pleased I look properly 'mad' here :D I wish I had some fake blood but I got too lazy to make my own :( Next year I must order some Mehron Coagulated Blood to add to the effect...


In retrospect I really wish I had worn some kind of underskirt to poof out the dress more *sigh* Ah well, maybe next time.  The above pose is based off the box cover of the first Alice game:


I really wasn't getting shots I liked so I decided to break out the Po-shopping skillz....! These are all screencaps from the Alice games, you might remember the first one from the sneak peak a few days ago ^_^


I think my favorite is still the one at the very top of this post, the one in front of the gate :D

Also for people who like a little behind-the-scenes, here are the original pics I took and some of the screencaps I used to create the pics above.  Since I wanted to paste myself into a new background, I needed to be against a solid background. And I'm standing on a white posterboard so I don't get my carpet dirty :P So scary huh ><?   And yes, I am posing with a real knife mwahaha :D


*whew* Anyway, I hope you enjoyed this look!  I'm going to be focusing on reviews again for the next several weeks and take a break from makeup-ing~

Happy Halloween! + Preview~


I thought this pumpkin was so cool - it was on PostSecret (the first thing I check on Sunday mornings)~ Also check out this yummy looking Halloween Oreo Pumpkin Cheesecakes at Tasty Kitchen.


Lastly, I was not able to get my last (and actual) Halloween look in time (nooooooooo) but here's a teaserrrrr!!!!


Yeah, that's me. Photoshopped into a screenshot of Alice 2. With a (real) butcher knife....or should I say Vorpal blade ;) YEAH.

I had so so so much fun doing this.  Love the game, love the dark version of Alice...so I got really into character and just went crazy with pictures (in case you couldn't tell ehhe)   So, yeah :)  I'll get the actual makeup tutorial for this look sometime Sunday night-ish?  I just need to finish editing the vid and watermarking pictures. And probably taking more pictures because I have to put everything back on again this evening for Halloween.

Have a wonderful, safe and
Happy Halloween!

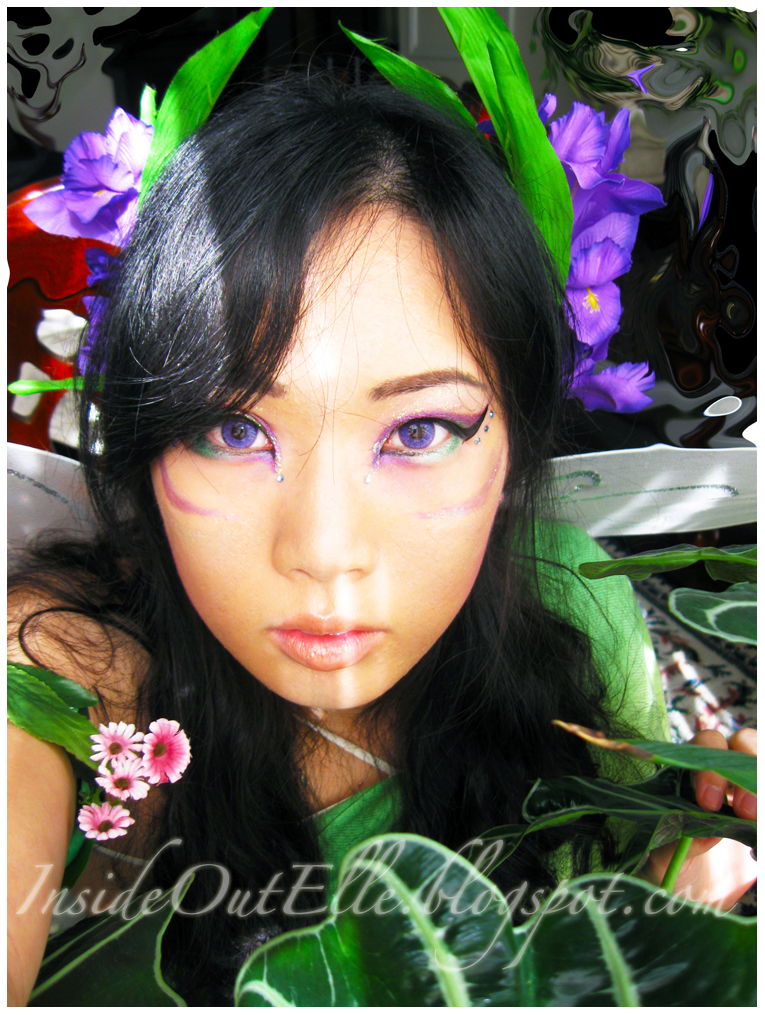
Wild Flower Fairy Makeup Tutorial

First off, I want to say thank to everyone who commented/watched my Rea-l Mayer video ^_^!  It was my first makeup tutorial and I wasn't sure how it'd turn out but you guys made every second worth it.

This was the "nature inspired" Halloween look I alluded to a few posts ago before Ergo Proxy bounced into my life.   It's actually one of the more tame looks I had in mind, before I wanted to do something totally psycho...like an insect or something just to see if I could do it xD   I prolly still will if I can cram it in before Halloween....aka in 8 days omg.


I forgot to mention in the video that I'm using a wet brush to intensify the color.  I like to just wet a paper towel and wipe my brush between colors and this both cleans and re-wets the brush for the next color.  Also to intensify the colors even more, use some kind of colored eyeshadow base before you apply the UD eyeshadows - my recommended eye shadow base would be the NYX Jumbo Eye Pencil in the appropriate colors (very affordable + tons of colors). I didn't do it in the vid though because I find the UD shadows to be pretty vibrant as is.

This look is essentially an UD Book of Shadows III look. I'm trying to use this palette as much as possible, mostly because it's my first legit palette ^^;; and I want maximize my purchase per se ;) So far I'm really liking the colors, they're super pigmented with minimal fallout (except Midnight Cowboy, which I now never use and is pretty much universally regarded as a bad eyeshadow even by UD-lovers).

Products Used:
* = in the UD BoSIII

* UD Primer Potion in Original
* UD Snatch eyeshadow
* UD Kush eyeshadow
* UD Psychedelic Sister eyeshadow
UD 24/7 Glide On Pencil in Yeyo
* UD 24/7 Glide On Pencil in Ransom
MAC Fluidline in Blacktrack
Koji Dolly Wink Liquid Liner in Black
UD Heavy Metal Eyeliner in Distortion (I said Pyrotechnic in the video...no idea why I said that -_-)
Missha Shining Style Stick Eyes in White
(yes I forgot to apply mascara X_X)
Revlon Brow Fantasy Pencil & Gel in Brown
Lioele Silky Highlighter BB Touch
Rock & Republic Pressed Blush in Tease
NYX Round Lipstick in Circe
C.O. Bigelow Menthe Lip Gloss
G&G GBT Violet Circle Lens (LOVE THESE. Review coming soon.)

Not shown in video:
Revlon Colorstay Liquid Foundation (sorry ^^ I said in the video it had no SPF :P)
L'oreal True Match Concealer in Cool (light/medium)
Neutrogena Oil Free Makeup Remover (is what I use on the Q-tip)

Ideas to enhance the look: I really recommend getting latex elf ears if you can (something really big and crazy would be cool ^^).  If you can get cuffed earrings too I think that would just take this look to a whole new level.  Also if you want a "wilder" looking fairy you could put a streak of dark lipstick on the center of you lower lip and use a black gel liner to trace more designs.  I didn't use setting powder because I wanted to look dewy but it made it a bit it hard to draw on my face with pencil because there was so much slip.  For the vid it was fine because I only wanted faint design but for a darker line, I'd say use a gel or a grease stick if you have one.  Also if you have your hands on a nice pair of lashes, use them.  I think one that wings out and is thicker on the outer ends would be particularly nice since they would enhance the exotic look.  Fyi, the lashes shouldn't be too dramatic or you'll overwhelm the eye shadow colors. This look can be adapted to be makeup for different colored flowers or an elf/pixie look... ^_^!

I had a little trouble editing this - I had an insane 45 minutes of footage.  I decided to try filming more "freestyle" - usually I film in little bits with each step on separate clips.  This time I just left the camera running and filmed it straight through.  Bad idea.   Anyway, the light was gorgeous today so I spent a lot of time hugging my mom's potted plants xD She has a thing for alien looking plants in case you haven't noticed :}


Here's a closeup of the eye makeup.  The top pic is too yellow and if you're wondering why my eye makeup looks a little different for each eye it's because my eyes are wonky; one has a double fold and the other is a hidden fold :P


For peeps curious about the flower crown, it's almost embarrassingly simple x.x I cover the tape in the back by flipping my hair over it after clipping the crown into my hair.


Anyway, if all goes well I'll be cranking out a few more of these :D  I hope you guys like!

Belle Hair

Our Version of Belle's Hair
Start with making a part in the front of her hair to give a center part.
Then pull up the top half of her hair into a ponytail

Next take the ponytail and make an upside down twist

The key is not to pull the hair all the way through the twist.

Take a ribbon and put around the ponytail part of the hair.

Tie the ribbon into a bow


Then make large ringlets out of the hair that is left down.

The picture below is a the side of her hair

Jasmine Hair

Our idea for Jasmine's Hair

Make 2 parts one in the center of her head and then take a small sections across the front of her head as shown below I put the pieces I wasn't using right now in elastics so I could control the hair a little better.


Here is a picture of the side of her head so you can see how the hair is parted.


Now put a ribbon behind the hair that was secured by the elastic on the side of her head.


I then back combed the crown of her head


Now take the hair on the sides and I twisted it all the way from the top since she has bands. I did this to keep the bangs in the right place. Twist on both sides then secure them together under about half of her hair.


The picture below shows how to secure the hair on the sides of her hair.


Take the remaining hair and secure in a low ponytail at the bottom of her head.


I then wrapped the ribbon around the ponytail. Then take another elastic and put it halfway down the remaining hair. I then took the ribbon and wrapped it around the last elastic.


Cinderella Hair

Pull all of her hair into a ponytail

Take the hair and make loops we did 3 different ones around the ponytail. I secured these in place with bobby pins


The goal is to make a loose bun


I used bobby pins to put the circles in place then we added a headband to top off the Cinderella Look.

Tinker Bell Hair

The 1st couple of steps are the exact same as Cinderella, however I did include them as well.
Pull the hair into a ponytail.

pull the hair and secure with bobby pins to make a loose bun. My daughters hair is longer so we rolled it into each other to make a smaller bun.


I made 3 different rolls to make the bun.


Once the bun is in place I took a small elastic and make a muffin top with her hair to give her the Tinker bell bun look.


This is the side picture below. Note: use bobby pins to place the hair where you want it.